Wednesday, January 18, 2012

Easy Chicken Casserole

I was lazy and didn't cook anything last week--oops! So to make up for it, I've already cooked two meals this week! Last night we had our delicious, delicious breakfast supper. Tonight we had chicken casserole, carrots, and broccoli.

This meal wasn't the prettiest--but it was surprisingly tasty! I'd never cooked chicken casserole before. Here's what I started with.


I had Ritz crackers, a can of store brand premium chunk chicken in water, a can of Campbell's cream of chicken soup, Uncle Ben's chicken flavored long grain and wild rice, and about 1/2 a cup of Breakstone's sour cream.

I started out with the rice. I followed the directions on the box and emptied the rice, seasoning packet, water, and butter into a small pan. I was a little concerned by how green the mixture was.


I brought it to a boil. At this point it looked a little like a witch's brew.


I reduced the heat and let it simmer (covered) for awhile. While it was simmering, I emptied the cream of chicken soup and canned chicken into a pan. I also added a little bit of milk. I heated it on low and stirred occasionally while the rice was simmering.


It took the rice about 20-25 minutes to cook. I knew it was done because most of the water was gone.The color looked a bit more appetizing now.


As soon as the rice was finished, I put the sour cream in the chicken mixture. I removed it from heat because I didn't want the sour cream to curdle.


I also poured in the rice and stirred it all together. I poured the mixture into two greased Pyrex dishes. I was a little concerned about the color--looked a little pale to me.


I crushed up some Ritz crackers and sprinkled them on top of the casserole. (I SHOULD have mixed the crackers in melted butter first--but I forgot.)


I'd preheated the oven to 375. Since the food was already cooked, I just put the casserole in for 15 minutes. But when I took it out of the oven, I decided to drizzle the Ritz with a little bit of butter and put it back in for 10 more minutes.

I made some broccoli with cheese. I wish I could say it was fresh--but it was a bag of frozen broccoli florets. I put it in a pot with some water and butter and boiled it for a few minutes.


I actually think I overcooked it--but that's okay because I don't mind mushy broccoli. I drained it and added some cheddar cheese.


I also made some carrots. From a can. Easy peasy. I did add just a little bit of sugar when cooking them.


Casserole is finished! 


I decided to cook a couple pieces of bacon in the microwave at the last minute to add to the top of the casserole. I just added it to one, though.


The verdict? Pretty yummy! (Notice that random piece of bacon off to the side.) Plus, we had enough for leftovers for lunch tomorrow.


I took one of the casseroles and some of the carrots and broccoli to my parents' house. I'm a good daughter--remember?

I could get used to this cooking stuff. Now if the dishes would just do themselves...

Here's the simple recipe.

Easy Chicken Casserole


1 box Uncle Ben's chicken flavored long grain and wild rice
1/2 cup sour cream
1 can Campbell's cream of chicken soup
1 can premium chunk chicken in water
1 sleeve Ritz crackers
butter, softened at room temperature
milk

1. Prepare rice according to directions on box. Mix rice, seasoning packet, water, and butter into medium saucepan. Bring to a boil. Then reduce heat, cover, and simmer for about 20-25 or until water is absorbed in rice. Go ahead and preheat oven to 375.
2. Heat cream of chicken soup, canned chicken, and a little bit of milk on low. Stir occasionally.
3. As soon as rice is finished, remove cream of chicken mixture from heat and add sour cream. Add the rice and stir all ingredients together.
4. Pour into greased casserole dish.
5. Crush up Ritz crackers and sprinkle on top of casserole. Drizzle a small amount of melted butter over the Ritz crackers.
6. Bake for 25 minutes. Watch carefully to make sure crackers don't burn.
7. Let cool for 5-10 minutes. Serve with your favorite sides.

Breakfast for supper!

I love breakfast food pretty much any time of day. I whipped this up for supper Tuesday night.


And let me just say--it was delicious! French toast, scrambled eggs, bacon, and cheesy hash browns. The hash browns were from a box... Idahoan Farmhouse Fix'ns Cheesy Hash Browns. Seriously, the best hash browns I've had in a long, long while.

This isn't my "Cooking for Two" this week, but I just wanted to share the yummy, artery-clogging goodness we ate last night.

Sunday, January 15, 2012

Progress Update - Week 2

I think I did a little bit better at keeping up with everything.

1. Get Crafty- Check!


2. Baking Extravaganza- Check! Yum, yum, yum.


3. Cooking for Two- No! I'm so ashamed!

4. Walk it Off- Four out of five days... again. I MUST do five days this week!

5. Declutter and Organize- Better. I've accomplished 7 out of 31 calendar items now. (P.S. I tried to link the original pin of the calendar--but I can't find it anywhere! I'm glad I saved the pdf.)

6. Alphabet Dating- Nope. We're still trying to figure out that perfect "K" date.

7. Read the Word- Yes! I finished Exodus and Leviticus. I'm now on Numbers.

8. Classics- Yes! I finally finished The Night Circus, so I began reading my first classic--Wuthering Heights by Emily Bronte. I'm through about 18% of it. Sad thing? I still really have no clue what it's about. I need to focus better.

9. Sell, Donate, Toss- Yep! I put together my boxes and I've been adding items. I've got about 30 things in my "Donate" box. Not many in my "Sell" box yet. I don't have a "Toss" box--I've just been throwing stuff in the garbage as I go. I'm confident I'll find enough stuff to fill those boxes by the end of the month.


10. Water- Check! I did only drink 2 glasses on Tuesday--oops. But I drank 4 the next day, so I'm counting that.

If I only I would've cooked something... I'd have felt really accomplished! I'm digging my progress so far, though. Gotta keep it up!

Yarn-wrapped Initial "Wreath"

The craft for Week 2 also involved a picture frame--next week's will, too! I'm sensing a theme here.

I got my inspiration from this Pinterest pin. Be sure to look at the original source, too! Check it out-- my version sure didn't do it justice. It was called a wreath in the original pin. I'm not sure I'd call mine a wreath--maybe just frame art.

I realize that I'm not the most crafty person. Sometimes I feel my work looks like it was done by a 6-year-old. I keep telling myself I'll get better with time. And hey, at least I'm trying!

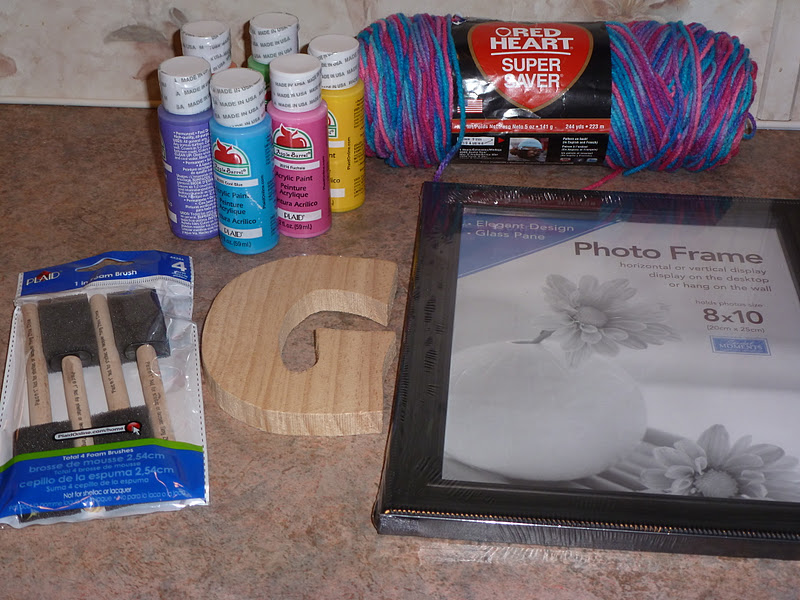
Anyway, here's the materials I used. Some multicolored yarn (around $2.00), wooden initial ($1.97), paint ($4.97 for the 5-pack), paint brushes ($0.99), and a frame ($1.00--from Dollar Tree!) Everything was bought at Walmart except for the frame.


First thing's first--take apart the frame. I didn't need the glass or the back. I'm saving it in case I need it for another project, though.


Next, I chose a corner and tied a knot. Make it a double.


I started wrapping until I finished one side of the frame. I made sure to wrap the yarn tightly around the frame. I didn't want any bulges or spaces. I had to fix some overlapping pieces from time to time, but that was fairly easy. I tied a double knot at the end and cut off most of the excess. I left a little bit that could be tucked behind the yarn. The most important part was keeping the yarn pulled tight during all that.


Wrapping the yarn took longer than I expected. I actually did it over the course of a couple of days. Notice how the corners aren't wrapped. I tried one of them and didn't like the look--so I left all four out.


There were a few spaces on the back, but I wasn't too concerned since that side wouldn't be showing.


I tucked in all the ends as neatly as I could.


I decided to paint my letter pink.


I realized that the foam brushes I bought were too large--so I used a pack of regular paint brushes I'd bought a long time ago.


One coat wasn't enough.


Two oughta do it.


I couldn't decide between horizontal.


Or vertical.


The hard part was trying to get the letter to hang evenly. I tried tying it from the top only and from the top and the bottom--no luck either way. The letter wouldn't hang straight.


That's when I took a break from the project. I had to think of something other than just yarn. I finally found this picture hanging kit at Dollar Tree.


I took one of the little gold hooks. I tried just hooking it in the notch on the back of the wooden letter. Not sturdy enough. Next, I pulled out the staple on the back a little bit. I looped the narrowest end of the hook through it. I tied a piece yarn around the other side of the hook. I had to mash it down to make sure it wouldn't come loose. I then tied the yarn around the top of the frame. I wrapped it around a few times to help with stability.


I also tied a piece of yarn in a bow around the top. That's what I'll hang it up with.


The view from the back looks kind of funky.


My finished project!


 So, that's my project. It's not the nicest, most professional looking thing--but I like it. Now to just find a place my husband will let me hang it. He says it's too girly. I'd totally hang it in my classroom (when I find another job!)

Saturday, January 14, 2012

When things don't go as planned...

I started this week's craft with high hopes and good spirits. The first half of the project went very well! I've ran into a little snag with the second half, though. I'm still working on it and hope to have it finished by tomorrow or Monday. Here's a little sneak peek.


I'll be sure to post more when I get it finished!

S'mores Brownies

I didn't get around to baking two different things this week, but what I did bake was absolutely delicious! Behold--S'mores brownies!

Here are my ingredients. I wasn't paying attention and picked up the Mocha Fudge brownie mix. Regular chocolate would be fine, too.


The smartest thing I did was using butter to grease my glass baking dish. I usually use Pam cooking spray and it leaves a disgusting, oily film. The butter had a much better taste!


I put a layer of graham crackers on the bottom of the pan. Notice how I had to break apart a few crackers to fit around the edges.


I mixed the brownie mix according to the directions on the box. I added an extra egg for "cake-like" brownies. The mix smelled amazing! I think it was the mocha flavor coming out.


I stirred, and stirred, and stirred. I couldn't get all the little lumps and air bubbles out, but that's okay.


I poured my brownie mix on top of the graham crackers. The directions said to bake between 28-31 minutes (I think.) I decided to bake for 27 minutes so the brownies wouldn't burn after I added the additional toppings.


Here's what I got after 27 minutes baking time.


I added some large marshmallows--20 to be exact. I tried to spread them apart evenly. I put them in the oven for 3 minutes.


I mashed the marshmallows down with a spoon, then sprinkled some chocolate chips on top. I put them back in the oven for 2 minutes.


I put the oven on broil for 1-2 minutes to toast the marshmallows. I watched them carefully--I didn't want them to burn! I think I got them just right.


I'd mashed up some graham crackers in a baggie while the brownies were baking.


I sprinkled those on top. Not the prettiest look, but oh-so-tasty!


I let them cool for about 25 minutes--that was hard because they smelled so wonderful!


Time for the moment of truth. I cut into the ooey-gooey awesomeness. Look how the graham crackers came up from the bottom during baking!


They were super moist. The mocha flavor was amazing. The marshmallows were just right. YUM!


My only complaint? They were super sticky and hard to cut because the marshmallows got stuck to the knife so easily. No problemo, though. I scraped it off with a spoon. Next time I could space the marshmallows out far enough so I'd only have to cut into the brownie when dishing out individual servings.

Chad doesn't like brownies--he says they give him indigestion. Pssh. He did taste them, though. I took about half of them to my mom and dad. I didn't want to be stuck with the whole pan because I knew I would eat them all! Plus, I'm just a nice daughter like that.

Overall, I'd definitely make these again. There are so many variations I could do--add some nuts, use peanut butter or butterscotch chips, garnish with Golden Graham cereal and Hershey's bars--lots of possibilities!