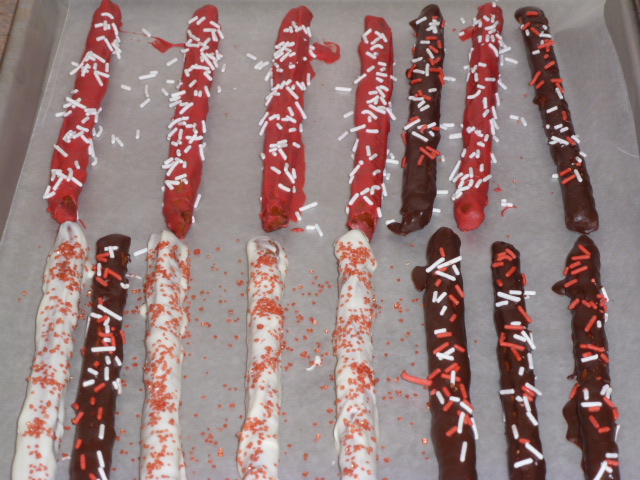
I decided to bake some things for Valentine's Day for my family. I think I had 6 baskets of baked goods in all. I got this bright idea before I started working again--so I didn't have as much time to make everything perfect. I forgot to take a picture of the finished basket. Boo! Here's what went inside the baskets, though.
Pillsbury Sugar Cookies--these were a great deal!
Brownies with red M&Ms candies on top. Shhh, they were Christmas M&Ms.
Chocolate covered pretzels. I used Wilton candy melts for these--and they were out of a clearance Christmas candy-making kit.
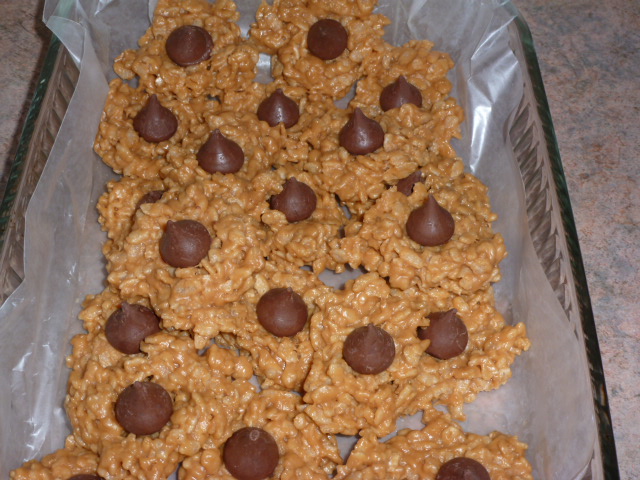
And peanut butter Rice Krispies with Dove chocolates in the middle.
I also had various candy mixed in--Hershey's Kisses, Russell Stover hearts, Reese's hearts, Snicker's hearts, etc. All of that was purchased on my couponing trips. The baggies and cellophane bags were from Dollar Tree.
Overall, the baskets were a big hit! Everything tasted great and my family loved them. I'll definitely do this again in the future. :)
Hubby and I had a great day. We went out to dinner after I got home from school. Then we delivered our baskets to our family. We spent the rest of the evening together relaxing. He surprised me with flowers, Breaking Dawn dvd, and an Adele CD. I gave him a gift card to Game Stop so he could buy the game he'd been wanting.
I love taking close-ups of flowers. So pretty!
I'm lucky to have such a great husband and family.
Wednesday, February 15, 2012
Friday, February 10, 2012
Valentine's Day Mantel
I decided to get a little festive for Valentine's Day!
We didn't decorate very much for Christmas. I couldn't get to my decorations because of all my teacher stuff in storage. Ugh! Soooo, I thought we'd bring a little cheer into our home by decorating for Valentine's Day.
I guess the whole thing cost around $10--minus printer ink.
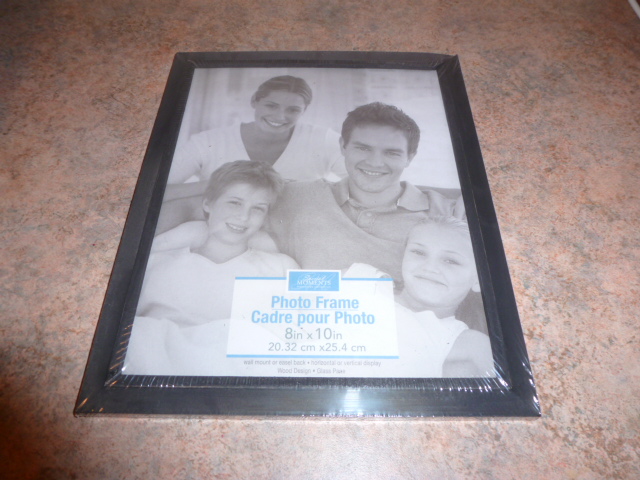
I needed 5 black picture frames from the Dollar Tree--two 5x7 and three 8x10.
One 8x10 was for the Conversation Heart Art I made a couple of weeks ago. Another 8x10 was for a wedding photo collage I was able to print for free at CVS (thanks to coupons!) The third 8x10 was for a printable. I found a TON of cool Valentine's Day printables courtesy of this link on Pinterest. The 8x10 was found at Eighteen25. I made sure to find a frame that could be turned horizontally.
The 5x7 frames were a little weird because they had mat insets. So, technically the frame was a bit larger than 5x7. I had to trim the pictures down, so that's why the spacing is a bit off. I found the 1 Corinthians 13 subway art at The Girl Creative and the LOVE printable at Sprik Space. The Sprik Space link is amazing, by the way. It had 15 free printables in various colors! Awesome.
I bought two artificial carnations at Walmart for 94 cents each. I happened to have two empty red plastic bottles that looked pretty cool. One was from Herbal Essences shampoo and the other was from Arizona tea. I liked how they looked, even if the bottles didn't match!
Finally, I made a wreath. I'm not super stoked with how it turned out, but it's not completely hideous. I used a small floral foam circle from Dollar Tree as my form. I'd never worked with floral foam before. I didn't know just how much dust would come off of it. I'd definitely go with styrofoam if I had to do over.
I started by tying a knot with the yarn, and then wrapped it completely. It was far from perfect--I tried to keep it as tight as possible, but I still had some spaces. I ended up going over the wreath again a few times to add a little depth. The third picture is of the back--thank goodness that part isn't visible!
I cut a piece of black and white polka dot ribbon and placed it around the top of the wreath. I put a dab of tacky glue near the top of the ribbon and held it together for a couple of minutes. I didn't glue it all the way at the top because I wanted to cut a little slit in the ribbon to hang the wreath on a nail.
I ended up adding a black flower for decoration. The flower is actually a hair elastic/pin. I just stuck it through the yarn and will remove it before I store the wreath.
So that's my Valentine's Day mantel! I hope to change it out each month. I'm going to put all my printables by month in an expanding file and reuse the frames. I'll try a different wreath approach next time. A ribbon wreath would be fun!
We didn't decorate very much for Christmas. I couldn't get to my decorations because of all my teacher stuff in storage. Ugh! Soooo, I thought we'd bring a little cheer into our home by decorating for Valentine's Day.
I guess the whole thing cost around $10--minus printer ink.
I needed 5 black picture frames from the Dollar Tree--two 5x7 and three 8x10.
One 8x10 was for the Conversation Heart Art I made a couple of weeks ago. Another 8x10 was for a wedding photo collage I was able to print for free at CVS (thanks to coupons!) The third 8x10 was for a printable. I found a TON of cool Valentine's Day printables courtesy of this link on Pinterest. The 8x10 was found at Eighteen25. I made sure to find a frame that could be turned horizontally.
The 5x7 frames were a little weird because they had mat insets. So, technically the frame was a bit larger than 5x7. I had to trim the pictures down, so that's why the spacing is a bit off. I found the 1 Corinthians 13 subway art at The Girl Creative and the LOVE printable at Sprik Space. The Sprik Space link is amazing, by the way. It had 15 free printables in various colors! Awesome.
I bought two artificial carnations at Walmart for 94 cents each. I happened to have two empty red plastic bottles that looked pretty cool. One was from Herbal Essences shampoo and the other was from Arizona tea. I liked how they looked, even if the bottles didn't match!
Finally, I made a wreath. I'm not super stoked with how it turned out, but it's not completely hideous. I used a small floral foam circle from Dollar Tree as my form. I'd never worked with floral foam before. I didn't know just how much dust would come off of it. I'd definitely go with styrofoam if I had to do over.
I started by tying a knot with the yarn, and then wrapped it completely. It was far from perfect--I tried to keep it as tight as possible, but I still had some spaces. I ended up going over the wreath again a few times to add a little depth. The third picture is of the back--thank goodness that part isn't visible!
I cut a piece of black and white polka dot ribbon and placed it around the top of the wreath. I put a dab of tacky glue near the top of the ribbon and held it together for a couple of minutes. I didn't glue it all the way at the top because I wanted to cut a little slit in the ribbon to hang the wreath on a nail.
I ended up adding a black flower for decoration. The flower is actually a hair elastic/pin. I just stuck it through the yarn and will remove it before I store the wreath.
So that's my Valentine's Day mantel! I hope to change it out each month. I'm going to put all my printables by month in an expanding file and reuse the frames. I'll try a different wreath approach next time. A ribbon wreath would be fun!
New job = less time for blog!
I've been fortunate enough to be called back to the interim teaching position I had in the fall. Yay! I love Second Grade. I've been very busy with planning, grading, and all the other stuff that comes along with a teaching job. Needless to say, my craftiness has had to take a back seat.
I'll still find some things to do and post periodically. As long as Pinterest is around, I'm sure I'll find inspiration.
I've done two additional crafts I'll post about later. I planned on making Valentine's Day baskets full of baked goodies, but I'm not sure if time will allow it. I've done fairly well with walking. I only walked three days this week, though. It's hard hopping on the treadmill after being on your feet all day at work! My water intake is not so good. A morning that starts at 4:55 requires caffeine. I'm at least drinking one bottle a day, though. I've been reading the Bible every day. I'm still in the Old Testament--1 Kings. Cleaning and organizing? That's kind of joke. We'll do our Alphabet Dates, but at the rate we're going, it will be 2025 before we finish them.
I'm still keeping my blog--I just won't have as many posts for the time being. Soooo, my new year's resolutions will probably be null and void. It's hard to make time for all those things when working full-time! But trust me... I'd rather have a job. :)
I'll still find some things to do and post periodically. As long as Pinterest is around, I'm sure I'll find inspiration.
I've done two additional crafts I'll post about later. I planned on making Valentine's Day baskets full of baked goodies, but I'm not sure if time will allow it. I've done fairly well with walking. I only walked three days this week, though. It's hard hopping on the treadmill after being on your feet all day at work! My water intake is not so good. A morning that starts at 4:55 requires caffeine. I'm at least drinking one bottle a day, though. I've been reading the Bible every day. I'm still in the Old Testament--1 Kings. Cleaning and organizing? That's kind of joke. We'll do our Alphabet Dates, but at the rate we're going, it will be 2025 before we finish them.
I'm still keeping my blog--I just won't have as many posts for the time being. Soooo, my new year's resolutions will probably be null and void. It's hard to make time for all those things when working full-time! But trust me... I'd rather have a job. :)
Saturday, January 28, 2012
Peanut Butter Rice Krispies Treats
This shouldn't be called Baking Extravaganza because there was no actual baking involved. But I'm leaving this sugary deliciousness in the Baking category.
I made peanut butter rice krispies... and they were absolutely delicious! I found the recipe from this pin on Pinterest. Check out the original source on Cooking with K. They're called Corey's Treats on there.
Here's what I started with-- a box of Rice Krispies cereal, Karo syrup, peanut butter, sugar, Hershey's Kisses, a large sauce pan, and wax paper. Super, super important to use wax paper for easy clean-up! I went ahead and lined two baking pans with wax paper so they'd be ready when the mixture was done. (No baking involved, though! Just used these for a nice, flat surface.)
The recipe said this would make 48 treats. So, I counted out 48 Hershey's Kisses. Yes, they're Christmas ones, but they were still good. It's just January, you know. Of course I tested one out for quality assurance.
I unwrapped all 48 kisses. Yummy.
I measured out 4 cups of Rice Krispies. (I recently found this HUGE Pyrex measuring cup in my cabinet. I'd forgotten all about it. I love it!)
Next I added 1 cup Karo syrup and 1 cup sugar to my sauce pan. I brought it to a boil then removed it from heat.
Then I added 2 cups of peanut butter. Two cups of peanut butter equals roughly 1 jar. I stirred it until it was nice and smooth.
Here comes the fun part! Add in the Rice Krispies and stir until they're completely covered. This was easy for awhile--but then the mixture got really thick! My wrist was tired from stirring before I got it all mixed up.
Next, I spooned the mixture on to the wax paper. I didn't end up with quite 48--I think I had 33 in all. I guess I made my treats a little too large. I ended up having to get another plate lined with wax paper to make them all fit.
As soon as I spooned out all the mixture, I pressed a Hershey's Kiss in the center of each treat.
See? Here are the leftover Kisses.
I let them cool completely. And let me tell ya, this was hard--they smelled wonderful!
These little things were absolutely delicious! A perfect little sugary, gooey, chewy treat.
They were dangerous. I had to give a few to my parents and grandparents or I just knew hubby and I would eat the whole batch ourselves.
I stored these babies in an air-tight Pyrex dish and they held up very well. They didn't dry out at all. Of course, they were gone in two days.
Would I make these again? ABSOLUTELY! They were so, so good. Check out Cooking with K for the full recipe.
I made peanut butter rice krispies... and they were absolutely delicious! I found the recipe from this pin on Pinterest. Check out the original source on Cooking with K. They're called Corey's Treats on there.
Here's what I started with-- a box of Rice Krispies cereal, Karo syrup, peanut butter, sugar, Hershey's Kisses, a large sauce pan, and wax paper. Super, super important to use wax paper for easy clean-up! I went ahead and lined two baking pans with wax paper so they'd be ready when the mixture was done. (No baking involved, though! Just used these for a nice, flat surface.)
The recipe said this would make 48 treats. So, I counted out 48 Hershey's Kisses. Yes, they're Christmas ones, but they were still good. It's just January, you know. Of course I tested one out for quality assurance.
I unwrapped all 48 kisses. Yummy.
I measured out 4 cups of Rice Krispies. (I recently found this HUGE Pyrex measuring cup in my cabinet. I'd forgotten all about it. I love it!)
Next I added 1 cup Karo syrup and 1 cup sugar to my sauce pan. I brought it to a boil then removed it from heat.
Then I added 2 cups of peanut butter. Two cups of peanut butter equals roughly 1 jar. I stirred it until it was nice and smooth.
Here comes the fun part! Add in the Rice Krispies and stir until they're completely covered. This was easy for awhile--but then the mixture got really thick! My wrist was tired from stirring before I got it all mixed up.
Next, I spooned the mixture on to the wax paper. I didn't end up with quite 48--I think I had 33 in all. I guess I made my treats a little too large. I ended up having to get another plate lined with wax paper to make them all fit.
As soon as I spooned out all the mixture, I pressed a Hershey's Kiss in the center of each treat.
See? Here are the leftover Kisses.
I let them cool completely. And let me tell ya, this was hard--they smelled wonderful!
These little things were absolutely delicious! A perfect little sugary, gooey, chewy treat.
They were dangerous. I had to give a few to my parents and grandparents or I just knew hubby and I would eat the whole batch ourselves.
I stored these babies in an air-tight Pyrex dish and they held up very well. They didn't dry out at all. Of course, they were gone in two days.
Would I make these again? ABSOLUTELY! They were so, so good. Check out Cooking with K for the full recipe.
Lemon Pepper Chicken Tenders
Okay, this meal was a disaster. Ick, ick, ick.
We attempted to make Lemon Pepper Chicken Tenders. I'd bought some lemon pepper flavored panko bread crumbs at the grocery store. I love lemon pepper chicken from Cheddar's, so I thought I'd like this, too. Wrong!
The first problem was that the chicken didn't thaw all the way. We'd had it in the fridge for at least 36 hours--but it still had some frozen spots. Of course I didn't realize this until after I had all the other ingredients measured out. Chad had said it was thawed, but he was wrong! After running a little bit of cold water over it, I thought it was ready.
I had three bowls--flour, egg, and the panko bread crumbs. I followed the directions on the box and rolled the chicken in each ingredient as specified (flour first, then egg, then panko.) This part was disgusting. I just hate touching raw meat!
I finally finished and put the tenders in a greased baking dish. I baked them at 375 for about 30 minutes. Here's the result.
We also had some green beans and mashed potatoes.
The verdict? I didn't like it at all! The lemon pepper panko was too strong. Plus, I am SO particular about my chicken. I was convinced it wasn't cooked all the way through, so I put some of it back in the oven. That made it even more disgusting.
I couldn't even eat one piece of it. I did like the crunch of the panko, but that's about it. I have some plain, so I'll try that some other time.
We attempted to make Lemon Pepper Chicken Tenders. I'd bought some lemon pepper flavored panko bread crumbs at the grocery store. I love lemon pepper chicken from Cheddar's, so I thought I'd like this, too. Wrong!
The first problem was that the chicken didn't thaw all the way. We'd had it in the fridge for at least 36 hours--but it still had some frozen spots. Of course I didn't realize this until after I had all the other ingredients measured out. Chad had said it was thawed, but he was wrong! After running a little bit of cold water over it, I thought it was ready.
I had three bowls--flour, egg, and the panko bread crumbs. I followed the directions on the box and rolled the chicken in each ingredient as specified (flour first, then egg, then panko.) This part was disgusting. I just hate touching raw meat!
I finally finished and put the tenders in a greased baking dish. I baked them at 375 for about 30 minutes. Here's the result.
We also had some green beans and mashed potatoes.
The verdict? I didn't like it at all! The lemon pepper panko was too strong. Plus, I am SO particular about my chicken. I was convinced it wasn't cooked all the way through, so I put some of it back in the oven. That made it even more disgusting.
I couldn't even eat one piece of it. I did like the crunch of the panko, but that's about it. I have some plain, so I'll try that some other time.
Sunday, January 22, 2012
Progress Update - Week 3
It's been three full weeks since I've started my endeavors. Time to check in and see how I'm doing.
1. Get Crafty - Check! It didn't turn out exactly as planned, though.
2. Baking Extravaganza - I did it, but I hate to admit I'm the creator of this mess.
3. Cooking for Two - Yep! We actually cooked several nights this week. Here's the yummy chicken casserole.
4. Walk it Off - YES! I did it! I walked all 5 days for at least 30 minutes. I knew cleaning off the treadmill would make me more motivated.
5. Declutter and Organize - Ugh. I'm not liking this one. I've only finished 9 out of 31 things. That means I only did 2 things since last week.
6. Alphabet Dating - No. Still no "K" date. Argh! We can't figure out what we want to do.
7. Read the Word - Yes, I've read the Bible every night! I'm now about halfway through Deuteronomy.
8. Classics - Uh huh. I'm about 60% finished with Wuthering Heights now. I've been listening to it while I walk on the treadmill. I don't enjoy that robot Kindle voice--they could at least make it sound a little more human.
9. Sell, Donate, Toss - I've got several things in both boxes now. I'll take a picture when I get them completely full.
10. Water - Yep! Three glasses a day.
I'm going to HAVE to declutter and organize next week. No excuses.
1. Get Crafty - Check! It didn't turn out exactly as planned, though.
2. Baking Extravaganza - I did it, but I hate to admit I'm the creator of this mess.
3. Cooking for Two - Yep! We actually cooked several nights this week. Here's the yummy chicken casserole.
4. Walk it Off - YES! I did it! I walked all 5 days for at least 30 minutes. I knew cleaning off the treadmill would make me more motivated.
5. Declutter and Organize - Ugh. I'm not liking this one. I've only finished 9 out of 31 things. That means I only did 2 things since last week.
6. Alphabet Dating - No. Still no "K" date. Argh! We can't figure out what we want to do.
7. Read the Word - Yes, I've read the Bible every night! I'm now about halfway through Deuteronomy.
8. Classics - Uh huh. I'm about 60% finished with Wuthering Heights now. I've been listening to it while I walk on the treadmill. I don't enjoy that robot Kindle voice--they could at least make it sound a little more human.
9. Sell, Donate, Toss - I've got several things in both boxes now. I'll take a picture when I get them completely full.
10. Water - Yep! Three glasses a day.
I'm going to HAVE to declutter and organize next week. No excuses.
Saturday, January 21, 2012
When icing attacks!
In the oven this week--cupcakes!
I had a going away party to go to, and I thought I'd bake a batch of cupcakes to take for the kids to enjoy. I had some new colored icing to try out. And what kid doesn't like cupcakes, right?
Well, I'll go ahead and tell you--these cupcakes did not make it to the party. Not because I ate them all myself since they were so scrumptious. But because they looked absolutely hideous, thanks to that funky icing! They don't taste that bad. Oh, but they sure look it!
Anyway, I started with this.
I mixed the ingredients according to the box. I added just a few mini chocolate chips to make the cake more moist.
I lined my cupcake pans with regular white cupcake liners. I had some cool blue and yellow ones I was going to use after they were finished baking.
I baked according to the directions--I think it was 22 minutes on 350. I let them cool in the pans for a little while, then I took them out and placed them on a large baking sheet to cool completely. They sure did smell good!
Here's when it started getting crazy. I had these tubes of Wilton cake decorating icing. It was supposed to be a blue and yellow swirl. It came with two tubes and two decorating tips.
Well, the icing was NOT blue and yellow. It just turned green. And the tube was so hard to squeeze! I could hardly get the stuff to come out. The first one didn't turn out so bad.
But as I kept squeezing, things got worse and worse. The tip clogged up. The icing wouldn't come out of the tube. It had air bubbles. Needless to say, it was not a pretty sight.
I only finished about 8 of them with one tube of icing. I moved on to the other tube and the other tip. This decorating tip was even worse! Aaaahh! I ran out of icing with three cupcakes leftover. See how awful they look?
I thought I'd just spread the frosting across the cupcakes. They wouldn't have that piped look, but at least the cake would be covered. That didn't work either! The icing was so hard and thick that it just ripped the top of the cupcake off. I gave up.
I decided to melt a little peanut butter, chocolate chips, and sugar in a bowl.
I dipped the last three cupcakes in that mixture and sprinkled a few chocolate chips on top. They at least looked better than the others.
This did NOT turned out as planned. No, no, no. I don't think I'd ever had such a hideous batch of cupcakes before. They don't taste bad--the cake is nice and moist and the icing has a decent enough flavor. But are they visually pleasing? Ha! Absolutely not. At least I didn't waste my fancy cupcake liners, though.
I think I'm going to stay away from the icing in a tube from now on. Let's hope that next week's baking has a much better result!
I had a going away party to go to, and I thought I'd bake a batch of cupcakes to take for the kids to enjoy. I had some new colored icing to try out. And what kid doesn't like cupcakes, right?
Well, I'll go ahead and tell you--these cupcakes did not make it to the party. Not because I ate them all myself since they were so scrumptious. But because they looked absolutely hideous, thanks to that funky icing! They don't taste that bad. Oh, but they sure look it!
Anyway, I started with this.
I mixed the ingredients according to the box. I added just a few mini chocolate chips to make the cake more moist.
I lined my cupcake pans with regular white cupcake liners. I had some cool blue and yellow ones I was going to use after they were finished baking.
I baked according to the directions--I think it was 22 minutes on 350. I let them cool in the pans for a little while, then I took them out and placed them on a large baking sheet to cool completely. They sure did smell good!
Here's when it started getting crazy. I had these tubes of Wilton cake decorating icing. It was supposed to be a blue and yellow swirl. It came with two tubes and two decorating tips.
Well, the icing was NOT blue and yellow. It just turned green. And the tube was so hard to squeeze! I could hardly get the stuff to come out. The first one didn't turn out so bad.
But as I kept squeezing, things got worse and worse. The tip clogged up. The icing wouldn't come out of the tube. It had air bubbles. Needless to say, it was not a pretty sight.
I only finished about 8 of them with one tube of icing. I moved on to the other tube and the other tip. This decorating tip was even worse! Aaaahh! I ran out of icing with three cupcakes leftover. See how awful they look?
I thought I'd just spread the frosting across the cupcakes. They wouldn't have that piped look, but at least the cake would be covered. That didn't work either! The icing was so hard and thick that it just ripped the top of the cupcake off. I gave up.
I decided to melt a little peanut butter, chocolate chips, and sugar in a bowl.
I dipped the last three cupcakes in that mixture and sprinkled a few chocolate chips on top. They at least looked better than the others.
This did NOT turned out as planned. No, no, no. I don't think I'd ever had such a hideous batch of cupcakes before. They don't taste bad--the cake is nice and moist and the icing has a decent enough flavor. But are they visually pleasing? Ha! Absolutely not. At least I didn't waste my fancy cupcake liners, though.
I think I'm going to stay away from the icing in a tube from now on. Let's hope that next week's baking has a much better result!
Subscribe to:
Posts (Atom)