I got my inspiration from this Pinterest pin. Be sure to look at the original source, too! Check it out-- my version sure didn't do it justice. It was called a wreath in the original pin. I'm not sure I'd call mine a wreath--maybe just frame art.
I realize that I'm not the most crafty person. Sometimes I feel my work looks like it was done by a 6-year-old. I keep telling myself I'll get better with time. And hey, at least I'm trying!
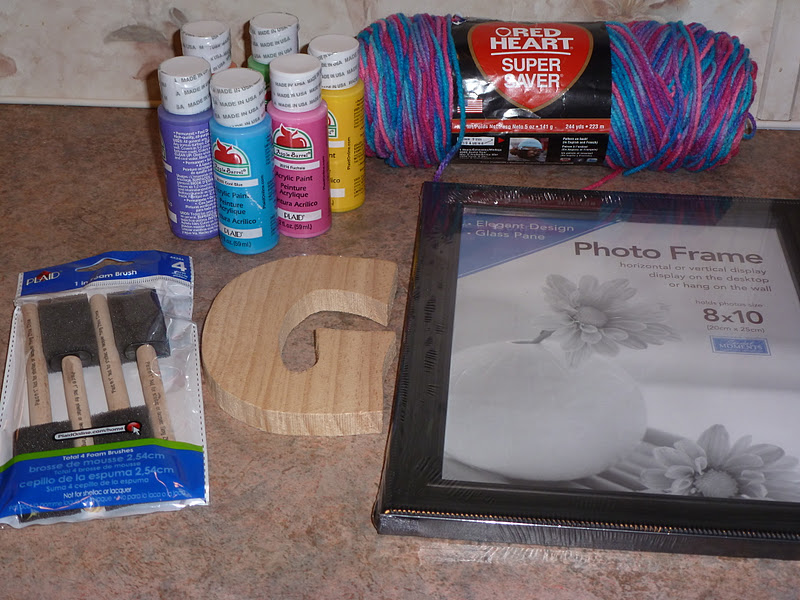
Anyway, here's the materials I used. Some multicolored yarn (around $2.00), wooden initial ($1.97), paint ($4.97 for the 5-pack), paint brushes ($0.99), and a frame ($1.00--from Dollar Tree!) Everything was bought at Walmart except for the frame.
First thing's first--take apart the frame. I didn't need the glass or the back. I'm saving it in case I need it for another project, though.

Next, I chose a corner and tied a knot. Make it a double.

I started wrapping until I finished one side of the frame. I made sure to wrap the yarn tightly around the frame. I didn't want any bulges or spaces. I had to fix some overlapping pieces from time to time, but that was fairly easy. I tied a double knot at the end and cut off most of the excess. I left a little bit that could be tucked behind the yarn. The most important part was keeping the yarn pulled tight during all that.


Wrapping the yarn took longer than I expected. I actually did it over the course of a couple of days. Notice how the corners aren't wrapped. I tried one of them and didn't like the look--so I left all four out.

There were a few spaces on the back, but I wasn't too concerned since that side wouldn't be showing.

I tucked in all the ends as neatly as I could.


I decided to paint my letter pink.

I realized that the foam brushes I bought were too large--so I used a pack of regular paint brushes I'd bought a long time ago.

One coat wasn't enough.

Two oughta do it.

I couldn't decide between horizontal.

Or vertical.

The hard part was trying to get the letter to hang evenly. I tried tying it from the top only and from the top and the bottom--no luck either way. The letter wouldn't hang straight.


That's when I took a break from the project. I had to think of something other than just yarn. I finally found this picture hanging kit at Dollar Tree.

I took one of the little gold hooks. I tried just hooking it in the notch on the back of the wooden letter. Not sturdy enough. Next, I pulled out the staple on the back a little bit. I looped the narrowest end of the hook through it. I tied a piece yarn around the other side of the hook. I had to mash it down to make sure it wouldn't come loose. I then tied the yarn around the top of the frame. I wrapped it around a few times to help with stability.

I also tied a piece of yarn in a bow around the top. That's what I'll hang it up with.

The view from the back looks kind of funky.

My finished project!

So, that's my project. It's not the nicest, most professional looking thing--but I like it. Now to just find a place my husband will let me hang it. He says it's too girly. I'd totally hang it in my classroom (when I find another job!)
No comments:
Post a Comment